X-Wing Walkthrough
An X-Wing forms when a candidate is restricted to the same two columns in two different rows (or two rows in two columns). The digit must occupy opposite corners of that rectangle, so it can be eliminated elsewhere in those lines.
Below are 3 positions from real puzzles, each captured when the solver first needs this move. Find the pattern on each before-board yourself, then read the notes and check the after-board, where removed candidates are struck out in red and solved cells shown in green.
Example 1: There is an X-Wing with the number 5
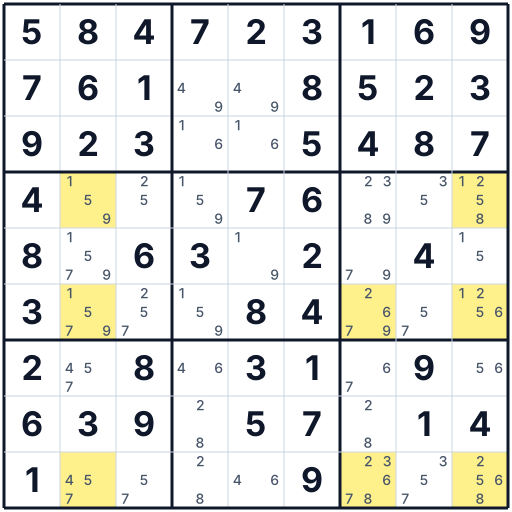
The hint names the 5, but this step applies two X-Wings, and the after-image shows both. For 5: rows 5 and 7 each have exactly two candidate cells, in columns 2 and 9, so the corners are r5c2, r5c9, r7c2 and r7c9, and 5 comes out of rows 4, 6 and 9 in both columns. The second is on 7, with the same two rows but columns 2 and 7. Column 2 is hit by both. r9c2 started as {4,5,7}, loses its 5 and its 7, and is solved as 4.
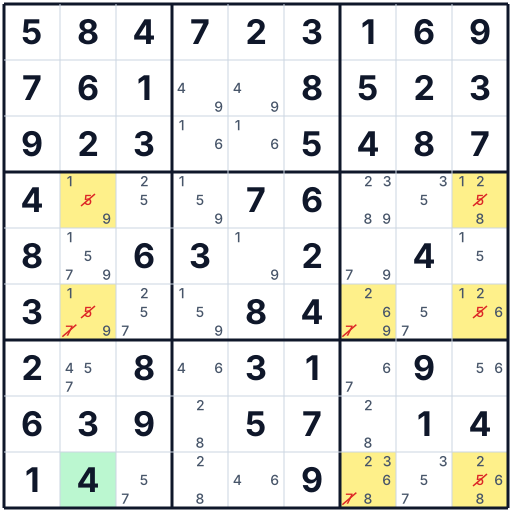
Example 2: There is an X-Wing with the number 4
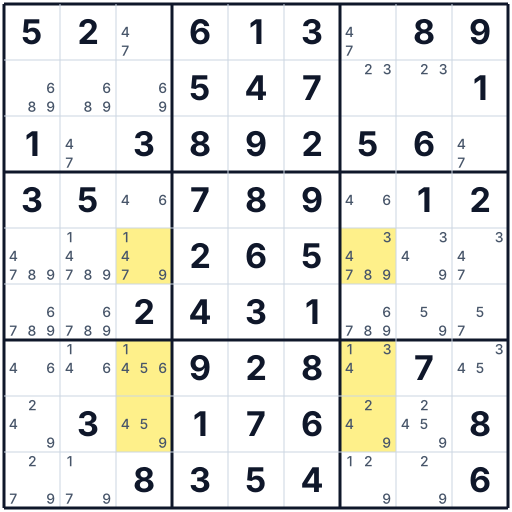
The cleanest of the three: one digit, one rectangle, and nothing else changes. Rows 1 and 4 each allow 4 in only two cells, both times in columns 3 and 7, so the corners are r1c3, r1c7, r4c3 and r4c7. That clears 4 from rows 5, 7 and 8 in both columns, six eliminations, three per column, and no cell is solved. Each column's two corners are in different boxes, so no box-based technique can see this pattern.
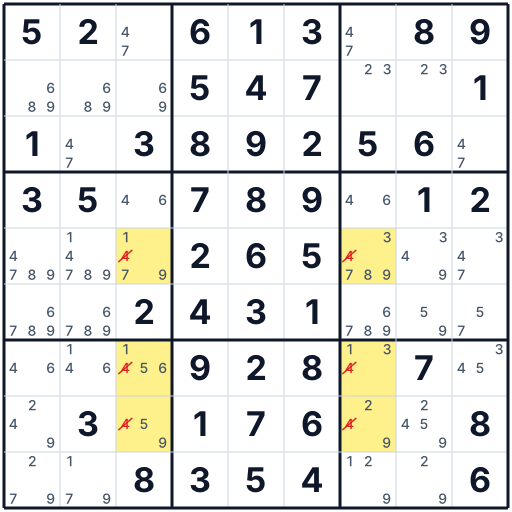
Example 3: There is an X-Wing with the number 2
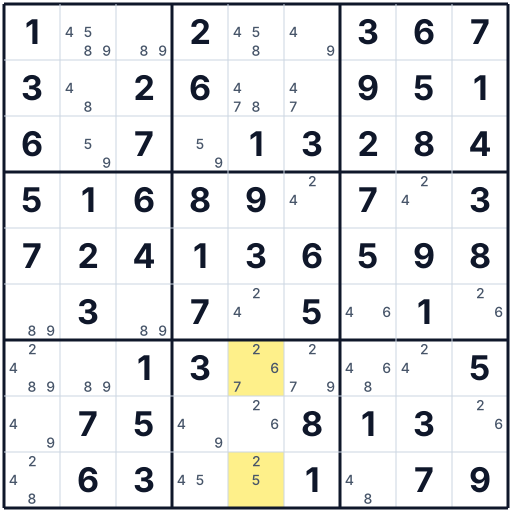
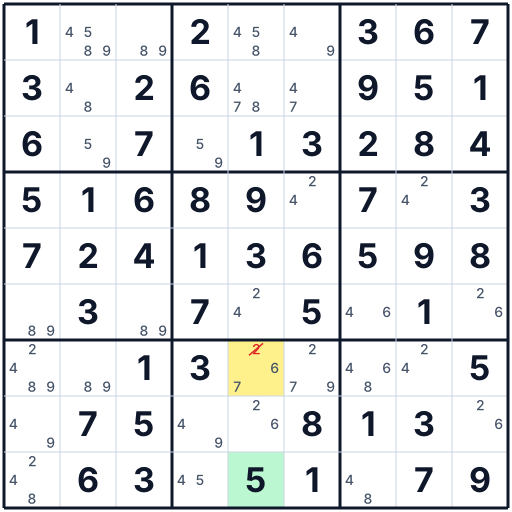
The rectangle here is rows 6 and 8 against columns 5 and 9. The 2 in row 6 can only go in r6c5 or r6c9, and the 2 in row 8 only in r8c5 or r8c9. Column 9 has no other 2 to remove, so all of the payoff is in column 5, where r7c5 and r9c5 lose their 2. r9c5 had only {2,5}, so it becomes 5. There is a second X-Wing on 2 in this position that the after-image does not apply: columns 6 and 8 confine the 2 to rows 4 and 7, which would also take it out of r7c1.
Why the deduction is valid
Take a digit that appears as a candidate in exactly two cells of one row, and exactly two cells of another row, with all four cells lining up in the same two columns. Those four cells form a rectangle. Each of the two rows must place the digit in one of its two corners, and because the corners share columns, the two placements are forced onto opposite corners — either the two on one diagonal or the two on the other. Whichever diagonal it is, both columns end up containing the digit inside the rectangle, so it can be eliminated from every other cell of those two columns. The same argument works with the roles of rows and columns swapped.
How to spot a X-Wing on your own board
- Choose one digit and mark every cell that could still hold it across the whole grid. Then read the rows: you want two rows in which that digit has exactly two possible homes.
- Check whether those two pairs sit in the same pair of columns. If they do, the rectangle is real; if the columns differ, move on.
- Repeat reading the columns instead of the rows. An X-Wing found column-wise eliminates along rows.
- Digits that are already placed five or six times are the most productive to test, because their remaining candidates are sparse enough to line up.
Common mistakes
- Accepting a row where the digit has three possible cells. Exactly two per line is the requirement — with three, the digit could escape the rectangle.
- Eliminating along the wrong axis. A row-based X-Wing clears the two columns, not the two rows. The rows are already fully accounted for and contain nothing to remove.
- Deleting the corners themselves. The four corners are the only cells that keep the candidate.
What to do next
X-Wing eliminations often unlock a Hidden Single further down one of the cleared columns, since removing the digit from several cells can leave it exactly one home elsewhere. Follow the cleared lines first, then re-scan normally.